Transitioning to virtual events
Event team
Essential
![]()
Organizer
Event host. Creates the event, sets permissions, invites event team, curates event links.
![]()
Producer
Responsible for starting and stopping the live event, queuing content, back-channel chat. This could also be the Organizer.
![]()
Presenters
Responsible for content and commentary. They can present audio, video, and share their screen with the attendees. May moderate Q&A.
Recommended
![]()
Moderators
Helps facilitate Teams Q&A or Yammer conversations in the live event.*
![]()
IT Administrator
Ensures network and service health in advance of your event. Policy configuration and monitoring. Manages technical support requests.
Tip: Event sponsors
In a larger organization, you may have an additional event sponsor with an interest in the education of audience or accountability for delivering the message. These executives are often non-technical and most engaged about the outcome of your event rather than the technical details.
*In Teams, moderators should be a person in the meeting Organizer or Presenter role. In Yammer, they should be a Group Admin.
Your attendees
![]() Your attendees may be participating in your event from unique locations. Consider who they are, what they are using, and where they are joining from to mitigate common event issues.
Your attendees may be participating in your event from unique locations. Consider who they are, what they are using, and where they are joining from to mitigate common event issues.
Identity
Are attendees full members of your Microsoft 365 tenant?
Will you support guest attendees?
Will you support anonymous attendees?
Configure these items in your service policies and meeting options. Proactively decide the scope of your viewing audience.
Devices and clients
Windows and Mac devices
Browsers and desktop clients
Mobile and tablet devices (Android, iOS)
Room devices
Text and screen readers
Device type dictates certain elements of the experience. Teams minimizes that impact by prioritizing quality, allowing for meeting controls and focus modes.
Location
Hard wired or wireless?
Mobile networks?
Cellular service only?
Bandwidth considerations can impact your event. Include an on-demand viewing strategy to ensure content can be accessed when attendees return to a good signal location.
Accessibility
Strive to have an accessible event and content. Utilize features like closed captions in broadcasts, alt-text for images, and the Accessibility Checker for PowerPoint. Learn more at https://aka.ms/PowerPointAccessibility.
Avoiding common issues
Creating a quality event can feel daunting. Follow these recommended steps from our experts to avoid common issues.
- Time to prepare: Even a simple one-person webcast needs production time. Schedule events in advance and avoid last minute productions when possible. Once you’ve done a few, you can reduce this time.
- Service and network health: Work with your IT department to ensure your network, service, and devices are healthy.
- Content quality: Smooth delivery will not make up for poor content. Is the message clear? Will someone new to the topic understand the intention?
- Presentation skills: Your speakers are the heart of your event quality. Ensure they have ample time to prepare and understand the presentation process.
- Event support: The longer and more complex your event is, the more you will need event support staff just like in a physical event. Train them early. Provide clear ways for attendees and speakers to request assistance.
Every event producer knows that things can and will go wrong, but your planning and rehearsals will mitigate your audience being aware. Keep your team morale high and relaxed for success.
Event scenarios

Webinars
- Destination learning events
- Individual or series. Funnel to conferences and communities
- Pre-recorded or live
- 2-way engagement with attendees (open or moderated)
- Includes hands on learning scenarios

Virtual conferences
- Single or multi-day experience
- Multi-track and varying content types
- Funnel to online communities for ongoing engagement
- Moderated Q&A

Online communities
- Managed communities for learning and ongoing engagement
- Community management support needed
- Ongoing schedule of events and meetings
- Combination of recorded content and live discussion

Leadership townhall
- 1 to many with managed Q&A
- Often moderated destination events
- Sometimes crafted in a regular rhythm of business or on demand

Public broadcasts
- 1 to many destination broadcast
- Optional custom streaming configurations
- May stream to additional platforms
Tip: Scale and complexity matter
Teams meetings and live events can be self-produced. For large scale or multi-day events, a broader event team is recommended.
Evolve your physical events to a digital format
New methods of sharing information are key to delivering a successful virtual event. It is important to embrace new ways of engagement to keep the interest of your audience. Strive to be different in alignment with your brand, context, and message. Train team members on new skills to maximize this new event model.
Shorter sessions
Minimize the amount of information you are trying to share. Have a clear topic and follow-up call to action. In multi-hour and multi-day events, plan breaks in your content delivery. Program short interstitial announcements or allow programming breaks to give time for attendees to stretch, walk the dog, or visit their facilities.
Interactive content
Use online polls, trivia games relevant to your content, and prepared video to keep the content moving. Ensure you allow for Q&A time. Pre-seed questions in the chat window to get the ball rolling. Many people are hesitant to come off mute and speak in a virtual forum. Allow enough silence to accommodate for delays in audio transmission/unmuting.
Presenter skills
Rehearse! There is no replacement for preparation. Online presentation skills are more complex when you are not receiving non-verbal feedback from your audience. Consider making speaker training mandatory as people adapt.
Semi-live model
Consider pre-recording core content. Play back pre-recorded sessions with live Q&A moderators, preferably the speakers. This reduces stress on production staff and speakers, allows for editing in additional on-screen elements, and still provides interaction with the audience.
Use our checklist
Use our checklist to stay on track and prepare for your virtual event. Download it from https://aka.ms/OrganizerChecklist.
Selecting your event experience
Combination events
Large scale, multi-day events may be a combination of Teams meetings and live event experiences. Match the interaction and broadcast method to the audience need.
 Live events
Keynotes
- All audience content
- Primary conference speakers
- Option for pre-recorded content
- No competing content scheduled
Choose experience by audience size and interaction model
Breakouts
- Core conference content
- Organize into subject tracks
- Select experience by projected attendance
- Use moderators to increase Q&A satisfaction
 Teams meetings
Interactive
- Two-way feedback sessions
- Interactive topics like feedback, ask-the-expert panels, hands-on-training
- Allowing attendees to unmute or share video
- Free flowing chat
Tips for a successful event:
- Provide navigation and awareness signposts on your primary attendee website or digital brochure.
- Make content available for attendees as soon as possible after the event. Use Stream for Microsoft 365, Microsoft Teams, or other popular online video portal technology to ensure a content lifecycle.
Selecting your event experience: Teams meeting
| 1What type of event? | 2What type of attendee experience? | 3How many people will watch the event live?* | 4What level of video production? |
| Single event | Open 2-way discussion | Up to 1,000 | Simple webcam and screenshare |
| Event series | Managed Q&A | Up to 20,000* | Multiple presenters |
| Part of an engagement community | No attendee discussion or Q&A | Up to 100,000 | Custom production |
![]()
Recommended:Teams meeting
Build community and authentic connection
- Provides open discussion features via audio and video for attendees
- Provide meetings as a part of a team to provide continuing engagement
- Support interactive chat during and multiple presenters in the meeting
- Familiar content and video sharing controls
- Use Yammer for your Teams produced meeting as a part of a community experience or series with continuing conversation
*Attendee limit increases over 10,000 are temporarily available until December 31, 2022. Events above 20,000 attendees require Live Events Assistance Program (LEAP) Engagement.
Selecting your event experience: Teams webinar
| 1What type of event? | 2What type of attendee experience? | 3How many people will watch the event live?* | 4What level of video production? |
| Single event | Open 2-way discussion | Up to 1,000 | Simple webcam and screenshare |
| Event series (coming soon) | Managed Q&A | Up to 20,000* (coming soon) | Multiple presenters |
| Part of an engagement community | No attendee discussion or Q&A | Up to 100,000 | Custom production |
![]()
Recommended:Teams Webinar
Share ideas, get leads, or provide training to an audience
- Provides a registration report to help gauge who is likely to attend
- Provides a structured meeting, with clearly defined meeting roles
- Provides attendee engagement data
- Use interactive chat during and includes multiple presenters in the meeting
- Familiar content and video sharing controls
*Attendee limit increases over 10,000 are temporarily available until December 31, 2022. Events above 20,000 attendees require Live Events Assistance Program (LEAP) Engagement.
Selecting your event experience: Live events
| 1What type of event? | 2What type of attendee experience? | 3How many people will watch the event live?* | 4What level of video production? |
| Single event | Open 2-way discussion | Up to 300 | Simple webcam and screenshare |
| Event series | Managed Q&A | Up to 20,000* | Multiple presenters |
| Part of an engagement community | No attendee discussion or Q&A | Up to 100,000** | Custom production |
![]()
Recommended: Live events
Manage the attendee experience
- Multiple live event options for maximum flexibility
- Broad scale and highly managed content experience
- Supports self-produced to custom production scenarios
- Live events can be publicized as a part of an engagement community
*Attendee limit increases over 10,000 are temporarily available until December 31, 2022. Events above 20,000 attendees require Live Events Assistance Program (LEAP) Engagement.
**Stream live events can be delivered outside an organization when planned though the LEAP team. It’s a case by case, temporary service to help customers communicate at scale outside their organization
Next Step: Follow Live Event selection decision tree
Which live event experience is right for me?
| 1How many people will watch the live broadcast? | 2Are there external attendees? | 3What type of attendee experience? | 4What level of video production? | 5Type of live event | |
| Up to 20,000* |
Include people from outside your organization | Moderated Q&A | Simple webcam and screenshare or Custom production | Live event in Teams | |
| Only people from inside your organization | Open discussion | Simple webcam and screen share or Custom production | Live event in Yammer | ||
 Start your live event experience Start your live event experience |
No attendee discussion or Q&A | Only Custom production | Live event in Stream | ||
| Up to 100,000** | Include organization-wide and outside your organization | No attendee discussion or Q&A | Simple webcam and screen share or Custom production | Live event in Teams |
To view the the full guide on selecting which event experience is right for you, visit this page in your desktop browser.
*Attendee limit increases over 20,000 are temporarily available until December 31, 2022. Events above 20,000 attendees require Live Events Assistance Program (LEAP) Engagement.
**100K attendee live events can be delivered outside an organization when planned though the LEAP team. It’s a case-by-case, temporary service to help customers communicate at scale.
Custom production scenarios including external encoder and multi-camera configurations will be covered in additional documentation.
Considerations by meeting types
![]()
Putting your attendees at the center of your decisions will often simplify overly complex plans.
Almost every consideration presented by the technology layer of your virtual event can be mitigated through planning, rehearsal, IT support, and prioritization of features for the attendee experience.
Teams meetings
- All team members receive channel meeting notifications
- Two-step process to export meeting chat for review and repurpose
- Chat with large groups can be difficult to follow
- Recorded meetings can’t be accessed by tenant guests
- Recorded meetings can only be downloaded by organizer
Live events in Teams
- Requires intermediate skills in live events and presentation software to self-produce
- Once the event is started, it cannot be stopped
- Any event interruption requires new meeting URL. Use a short URL redirector for simplicity.
- Chat is moderated
- Attendees cannot unmute or share video/content
- Download video and transfer to on demand viewing system for external guests
Live events in Yammer
Live event in Teams considerations, plus the following:
- Content sharing in separate document library
- Supports ongoing conversation and hashtags
- Have clear post-event messaging for moderation or self-service
Combination event
- Increased event management complexity when using different experiences
- Must manage schedule changes in conference site experience
- Need dual skills for meeting production and moderation
Each organizer must set the priority of meeting size vs engagement.
Live Events: Supported platforms by role
| Desktop | Web | Mobile | |
| Producer | Yes | No | No |
| Presenter | Yes | No | Yes* |
| Attendee | Yes | Yes | Yes |
*Presenter can join a live event via mobile with audio capability and to view shared content, along with video, but they cannot share content from their mobile device.
Understanding Guest attendee behavior for virtual events
![]()
A “Guest” in the event context means an Attendee who does not have log-in credentials issued from the host tenant. They have a log-in credential from their home domain.
Example: Sally@Contoso.com wants to host a Teams live event from Contoso.com. She invites Bob@microsoft.com and John@outlook.com to attend the event. Bob and John are both Guests of the Contoso.com tenant for this event.
*For detailed, supplemental information, review our technical documentation for planning for live events.
Teams-produced live events: For external contacts
Guest users
| Attendee | Presenter/Producer | |
| People and groups | Yes (CC) | Yes (CC) |
| Org-wide | Yes (CC) | Yes (CC) |
| Public | Yes | Yes (CC) |
(CC) = Change organization context via the tenant switcher in desktop client. Attendees can switch context and view via an in-private browsing experience. There is no support for producing from the Teams web experience.
Federated users
| Attendee | Presenter/Producer | |
| People and groups | Yes* | Yes (L) |
| Org-wide | No | Yes (L) |
| Public | Yes (L) | Yes (L) |
(L) = Wait in the lobby
*If member of selected group/user list
Now that you’ve selected which technology will best serve the needs of your event, take these important steps:
- Talk with your IT Administrator to ensure you have access to the selected services
- Assess the skills of your event team
- Review online training or ask for help to fill identified gaps
If you are also filling the role of the IT Administrator in your organization, review our materials on service health and readiness.
Use our resources to ensure your event organizers and producers have successful virtual events.
- Validate network health
- Review policies for service access and configuration
- Provide a clear path for support
Utilize our core technical documentation on Learn.microsoft.com/docs or visit our Virtual Event Forum to ask your questions of our experts.
Who can use live events?
Who can create events?
- Grantee from the admin
- Enterprise E1, E3, E5, or Education A3, A5
- Enabled Microsoft Stream license
- Special requirements:
- Teams-produced events require a Teams license
- Yammer event creators must be group admins
Who can watch events?
- Viewers granted permissions to the event
- Viewers with a valid license
- Exceptions: Teams-produced events can be set as externally anonymous access
Networking and bandwidth considerations
Producing in Teams
- RTP traffic sensitive to network
- Delay can affect interaction between presenters
- Jitter and packet loss can affect quality of audio and video
- Quality issues of presenter will affect all participants
Producing externally
- Quality issues of RTMP stream will affect all participants
Live event attendees
- Watching a video is not real time communication and not as sensitive to networking issues
- Networking issues might lead to delay and buffering or reduced video quality
- Plan for sufficient bandwidth for multiple people to watch from the same location
Live events high level architecture
Schedule
Organizer
Organizer
Produce using Teams
Presenter(s)
Presenter 1

Presenter 2
Produce using app/device
Presenter(s)
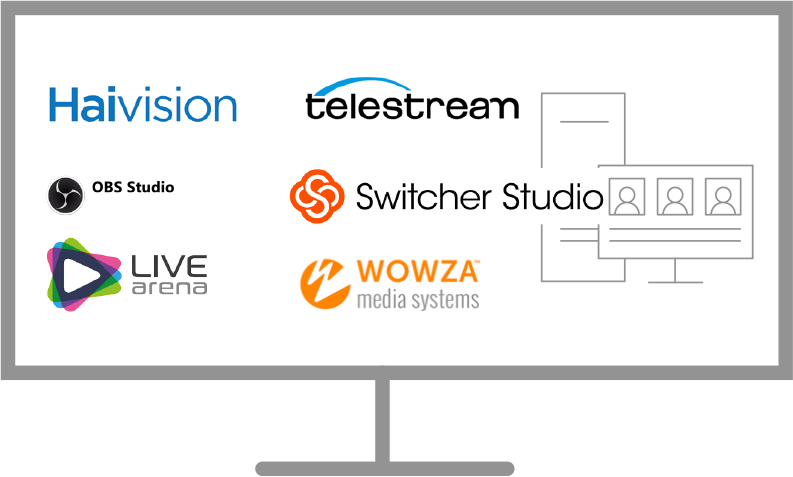
RTMP Device
Going live
Producer

Producer
Cloud delivery
Azure Media Services
Content Delivery Network
Network delivery
(3rd party eCDN)




View
Audience

Watch on desktop,
web, mobile
Media flows
Production (in Teams)
Presenter

Presenter 1

Presenter 2
Production (externally)

Production tools

Media mixer
Microsoft 365, Next-gen Skype Infrastructure and streams
Azure Media Services
Content Delivery Network (CDN)
Archiving

Content Delivery Network
Player embedded in many clients
(Desktop, Web, Mobile)
Live events policies
Why
Teams live events policies are used to manage event settings for groups of users
Considerations
You can use the default policy or create additional policies that can be assigned to users that hold live events within your organization
Does your organization have a requirement to host webinar style conferences?
Is the ability to record or transcribe a live event important to your organization?
How
Teams settings are configured via the Microsoft Teams Admin Center and PowerShell
Details: https://aka.ms/teams-live-events
Live event policy setup
- Control who can host live events and the features that are available in the events they create
- Use the default policy or create one or more custom live events policies
- After you create a custom policy, assign it to a user or groups of users
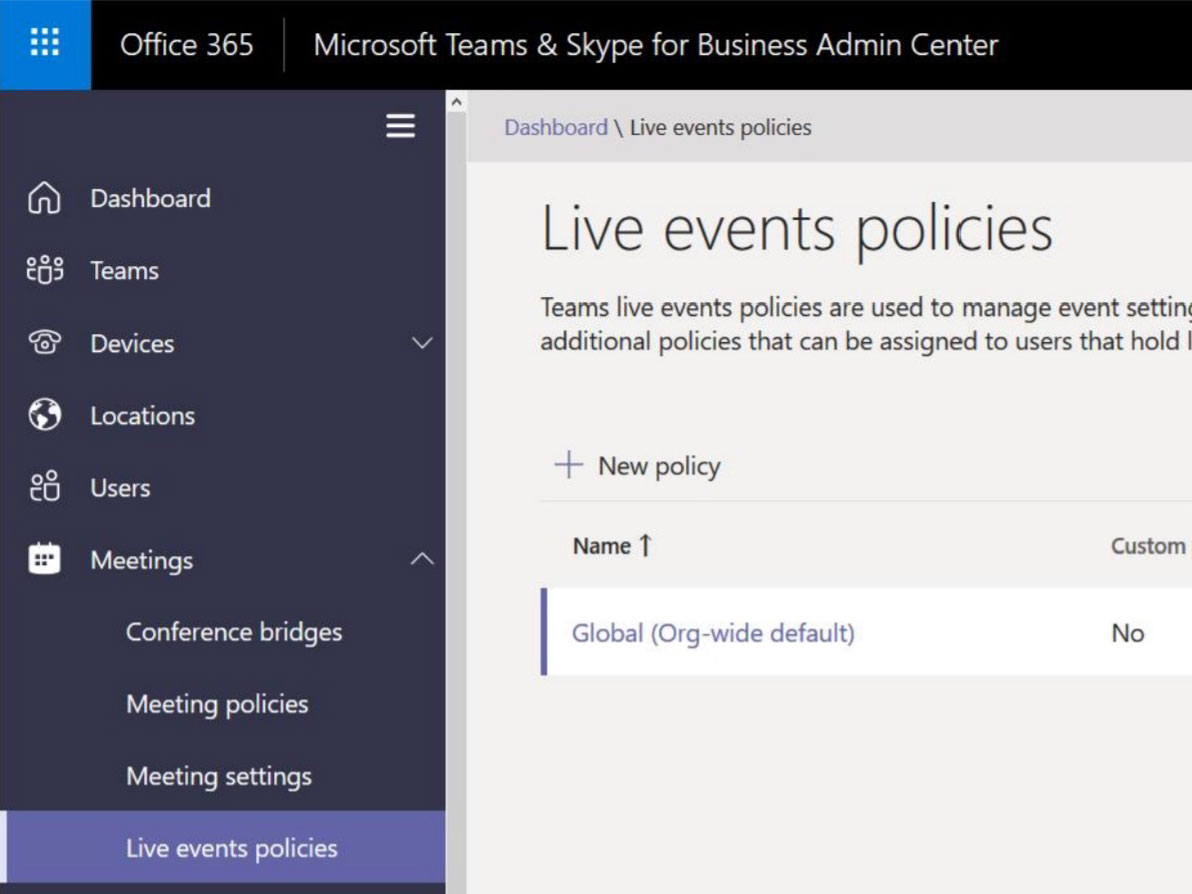
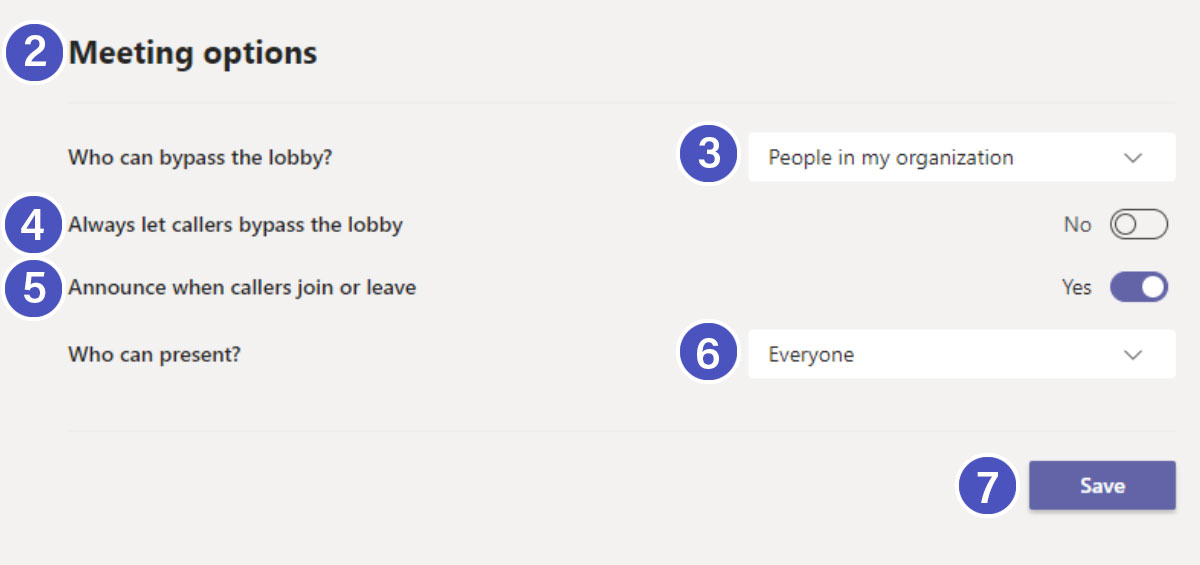
Microsoft Teams Admin Center, Meetings – Live Events policy setup page
Live events settings
Allow scheduling
Allows users in your organization to create and schedule live events in Teams.
Allow transcription for attendees
Enables attendees to see real-time captions and translation during the event.
Can only be applied to quick start events.
Who can join scheduled live events
Everyone – Users can create events that employees internal and outside your organization can attend.
Everyone in the org – Users can create events that only people in your organization can attend.
Specific users or groups – Users can create events that only specific users or groups in your organization can attend.
Recording
Always record – Events created by users are always recorded and can be downloaded after the event.
Never record – Events created are never recorded.
Organizer can record or not – Users can decide whether to record the live event.
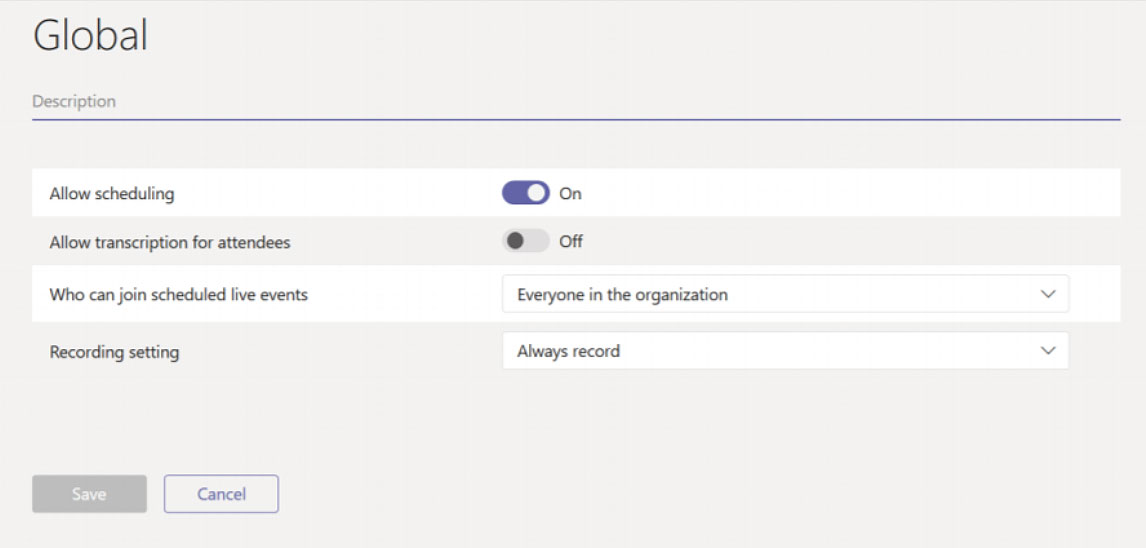
Microsoft Teams Admin Center, live event policies options
[Get|set|new|grant]-CsTeamsMeetingBroadcastPolicy
Teams live events tenant-wide configuration
Tenant wide configuration PowerShell only
[get|set]-CsTeamsMeetingBroadcastConfiguration
| Attribute | Description |
| Support URL | Set up the support link that should be shown to live event attendees |
| Allow eCDN | Select your desired eCDN provider from the list |

Other policies impacting live events
Users
Presenters need meeting policies that allow for screen sharing.
Meeting policies should not limit the bandwidth for sharing.
Considerations on leveraging Teams within virtual events:
| Product | Teams Meeting | Microsoft 365 Events produced via Teams | External encoder RTMP Stream |
| Delivery platform | |||
| Audience |
Internal External |
Internal External |
Internal |
| Access |
Internal: AAD External: Unsecured URL - self-managed attendee list |
Internal: AAD External: Gated URL unless anonymous selected |
Internal: AAD |
| Audience size | 1000 interactive, 20k with View Only (Meetings) 1000 limit (currently for Webinars) |
10k (20k through Dec 31, 2022) | 10k (20k through Dec 31, 2022) |
| Run yourself (no production involvement) | Yes | Yes | No |
| Hardware requirements | PC/Camera | PC/Camera | Production (Cameras audio, live switching) + Encoder (hardware or software) |
| Duration | 30 hours | 16 hours (through Dec 31, 2022) | 16 hours (through Dec 31, 2022) |
|
Live mixing of sources/presenters in meeting Distinct roles empower Producers, Presenters and Attendees |
No | Yes | No |
| Captions | AI Caption CART Captions |
AI Captions only (Captions not yet available in Yammer) | Human Captions only |
| Caption translations | Yes | Up to 6 languages | No |
| Moderated Q&A (Chat) | Available | Yes | Yes |
| Unmoderated Q&A (Chat) | Yes | No | No |
| Verbal Q&A within platform | Yes | Presenters Only | Presenters Only |
| Automatic live to VOD transition |
Yes (Only available to internal audience on Stream) |
No | Yes |
| Reporting | Attendee Reporting |
Unique Viewership GEO Viewing Duration Individual aliases |
Unique Viewership GEO Viewing Duration |
Audience
Production
Captions
Interactivity
Post-event
Delivering content within the network
Client Requirements:
Live bitrate profile
- 720p: 1.7 Mbps
- 540p: 850 Kbps
- 360p: 350 Kbps
- 240p: 140 Kbps
eCDN solutions
- Reduce network traffic crossing the company firewall
- P2P or cache proxy solutions
- Real-time monitoring and in-depth analytics
Scheduling your live event
Meetings spectrum
Ad-hoc collaborative

Persona: Engagement Manager, CEO
Scenario: Daily standup, Leadership Review
Spectrum produced

Persona: Product Leader, Director
Scenario: Tech Talk, Shiproom
Studio produced

Persona: Studio Producer, Product Marketer
Scenario: Town Hall, Launch Demos
Before scheduling
Ahead of scheduling your virtual event, ensure you are coordinating with your IT Administrator to be aware of any limitations placed on your meeting by tenant policies. Note that some of the features may not be exactly what an end user will experience due to:
Teams policies set in the admin portal.
How the end user accesses Teams (e.g. web client vs desktop).
Where the company is at with new features being rolled out from the tenant level.
Schedule a live event from Teams
First time scheduling live events from Teams? This section will guide you through how to organize a live event and determine which roles your team should play in the production and moderation of the event.
Schedule a live event from your Calendar in Teams by clicking the drop-down menu next to New meeting button and selecting Live event.

Setting up a live event
The New live event screen is where you define the following details about your event:
- Title of your live event
- Dat, Start and End times of your event
- Who you will invite as Producers and Presenters for the event
The Invite people to your event group area is where you define the roles for your event team members. The following roles are available:
- Producer: As a host, makes sure attendees have a great viewing experience by controlling the live event stream. There is usually one Producer, but you can have multiple for backup of the primary.
- Starts and stops the live event
- Shares own video
- Share participant video
- Shares active desktop or window
- Selects layouts
- Presenter: Presents audio, video, or a screen to the live event, or moderates Q&A. There are usually multiple presenters, and some may only have the role of moderating the Q&A as an example.
Once you have completed all the fields, click Next to continue.
Important Note – We have not defined who will be viewing the live event as an attendee yet. We have simply defined who will be producing and presenting in your live event.

Live event permissions
Next you will choose who can attend your event based on the following permission types:
- People and groups – The event can only be watched by people, contact groups, or Microsoft 365 groups you name.
- This permission type is ideal for confidential live events that should only be viewed by the specific people or groups defined here.
- Org-wide – Everyone in your organization can watch the live event, including guests.
- This permission type is best for all other live events where the content is not confidential.
- Public – Anyone can join, both people in your organization and those outside of it.
- This permission type would apply to a scenario where you intend for the general public to attend a live event, such as your customers or shareholders.
- Note – In many organizations, this option is disabled by IT but can be permitted to certain individuals based on a policy.
Before clicking Schedule, scroll down to reveal options that pertain to How will you produce your live event. These will be covered on the next section.

TIP: If your public event is supporting anonymous Attendees, do not select “Recording available to attendees” as they will not be able to access it. Follow the post-event guidance and publish in alternate locations.
How will you produce your live event?
Finally, you will select a number of available options for how your live event will be produced.
- Teams or An external app or device
- To produce the event in Teams, keep the default option of Teams. The other option, An external app or device, is if you wish to have your event produced by a formal audio and visual department or an outside AV company.
- Recording available to producers and presenters
- A recording is available to Producers for download for 180 days after the event is over.
- Recording available to attendees
- Attendees can watch the event on demand using DVR options for 180 days.
- Captions
- Captions are available to event participants.
- Attendee engagement report
- You can download a report that tracks attendee participation.
- Q&A
- Attendees can interact with Producers and Presenters in a moderated Q&A.
Now that you have selected all of the options you desire, you can click Schedule to continue.
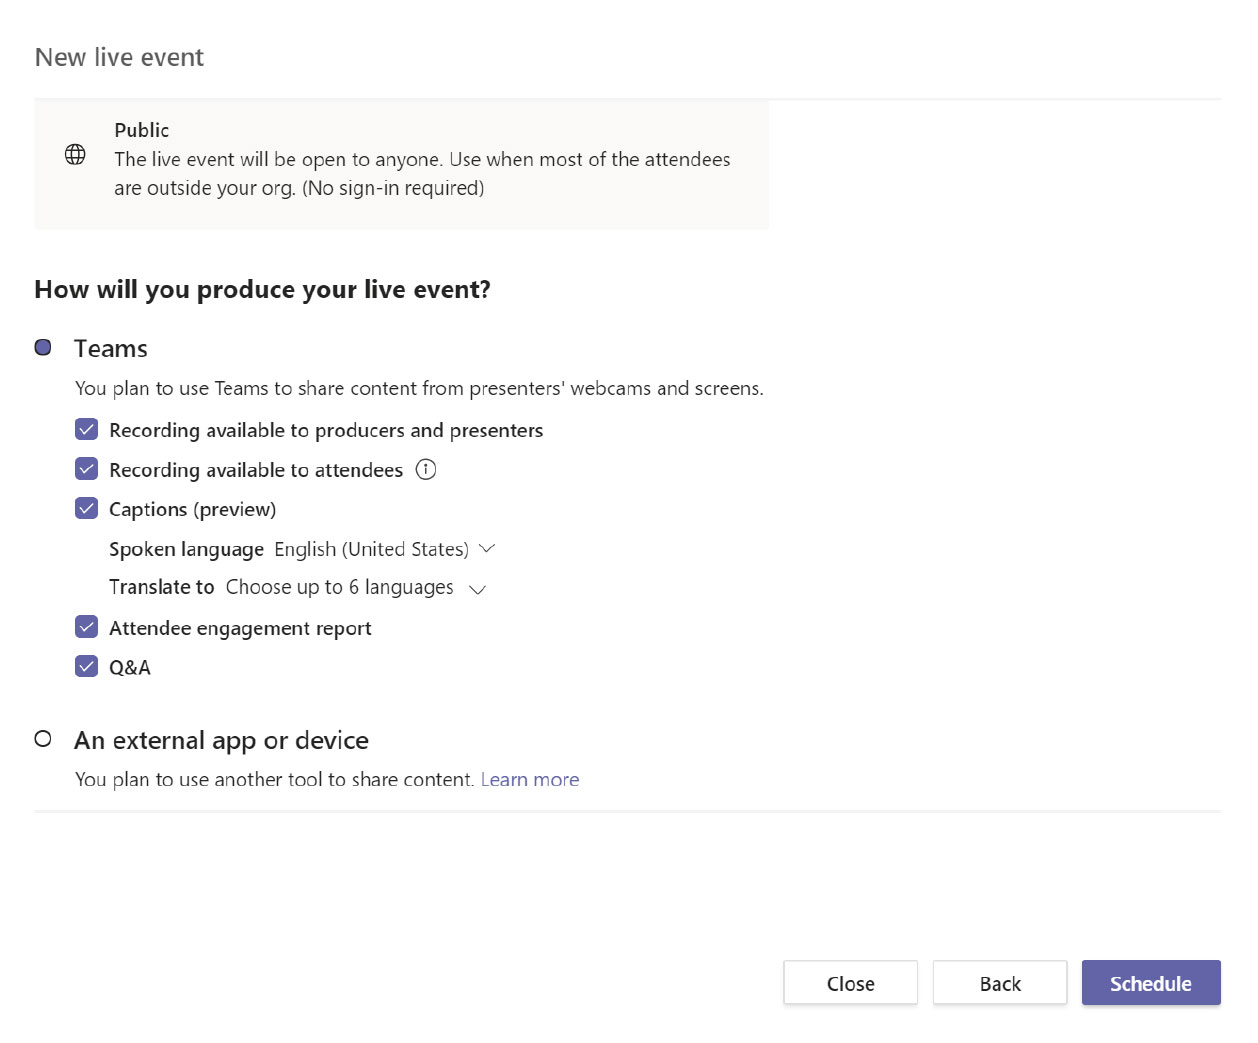
TIP: If using an external device, your video stream cannot be viewed by Guests of the tenant.
Get the link for Attendees
The next step in finalizing the setup of your live event is to copy the attendee link for your event. The attendee link is how your event attendees will attend the event.
Click the Get attendee link to copy the link to the clipboard. You can now publish that link however you desire. Common ways of publishing it includes:
- Sending an Outlook calendar invite to your intended attendees and pasting the attendee link into the body of the calendar invite
- Publishing via a company newsletter
- Publishing to an internal intranet site
Once you have copied the attendee link, you can now click Close to schedule the event. Producers and Presenters will receive an invitation in their emails with a link only valid for the Producers and Presenters of the event.

TIP: Forwarding invitations does not allow someone to become a Producer or Presenter. The organizer must edit the event and add them through the Teams experience. Once a live event has started, you cannot add Producers or Presenters.
Scheduling your Teams meeting
Before scheduling
Ahead of scheduling your virtual event, ensure you are coordinating with your IT Administrator to be aware of any limitations placed on your meeting by tenant policies. Note that some of the features may not be exactly what an end user will experience due to:
Teams policies set at the admin portal.
How the end user accesses Teams (e.g. web client vs desktop).
Where the company is at with new features being rolled out from the tenant level.
Creating a meeting invite in Outlook
- Open your Outlook Calendar*, click the Home tab, and then click the Teams Meeting icon.
- Select the Teams icon. When you do so, a Join a Microsoft Teams meeting link is created in the body of the invite. If you have an auto conferencing license, a phone number and conference ID will be included.
- Enter a Title for your meeting invite.
- In the Required box, enter the email addresses for the people you want to invite to the meeting.
- Select a Start and End time for the meeting.
- If you need the meeting to be recurring, select the Make Recurring icon.
- Add content to the body of the invite to inform participants of the purpose of the meeting.
- Double check your information and then click the Send button.
*Your calendar in Teams is connected to your Exchange calendar. In other words, when you schedule a meeting in Outlook, it will show up in your Teams calendar, and vice versa.
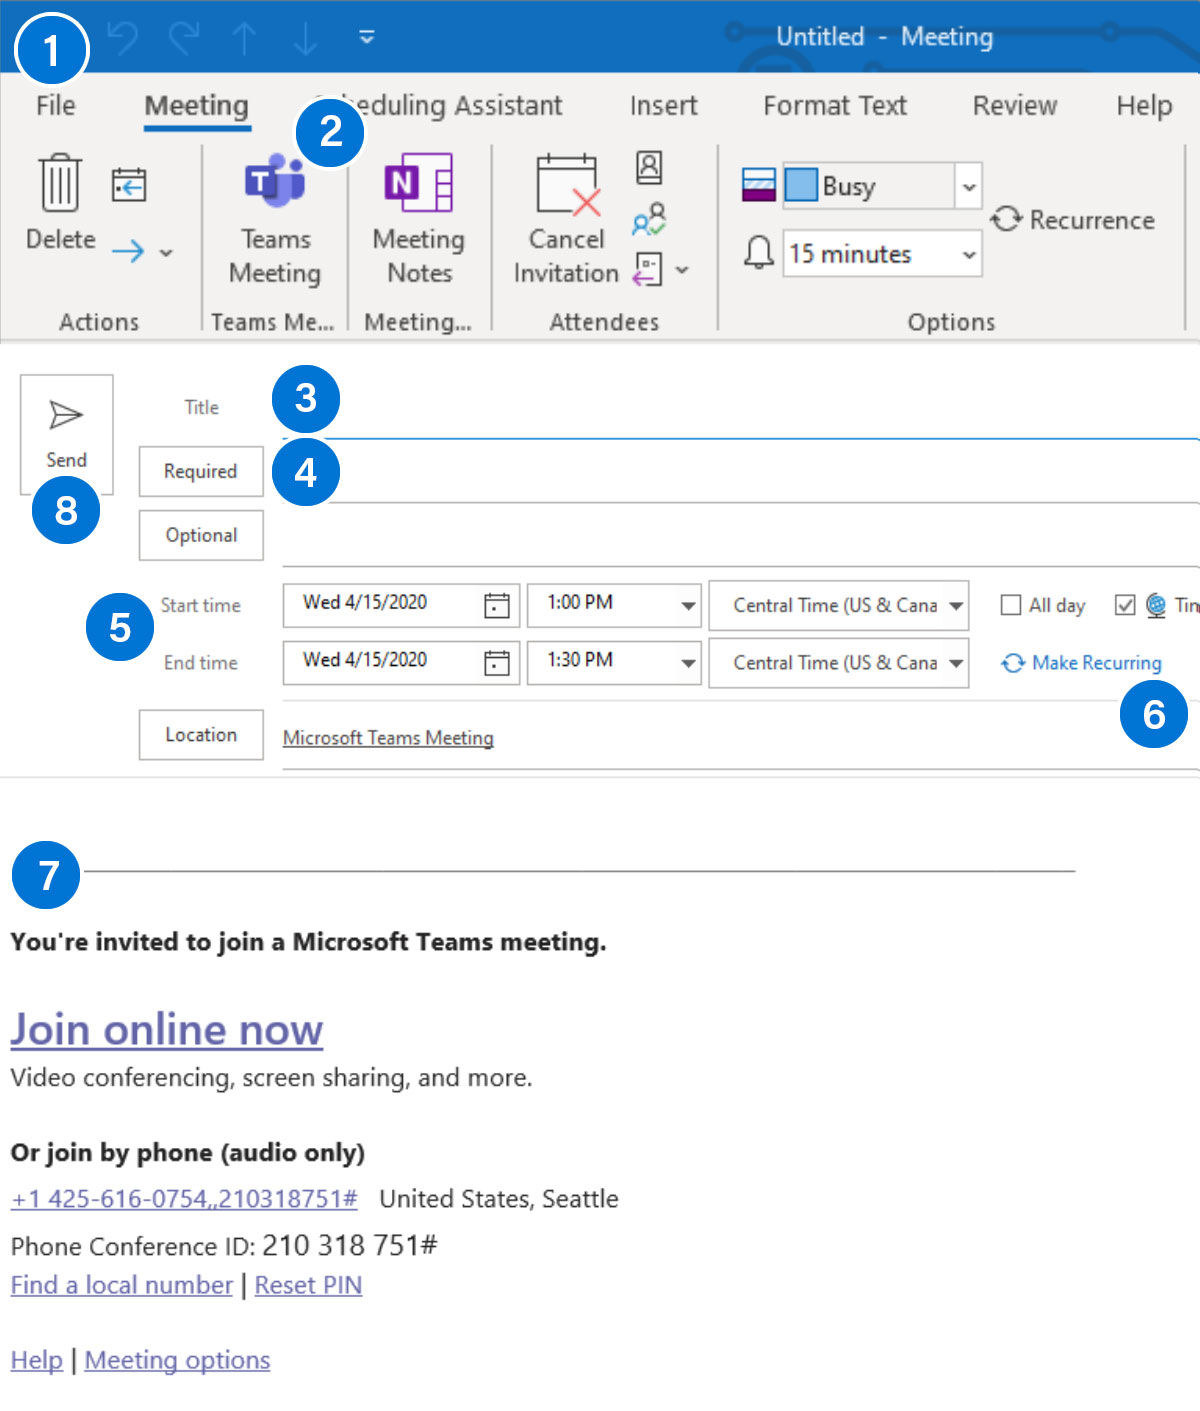
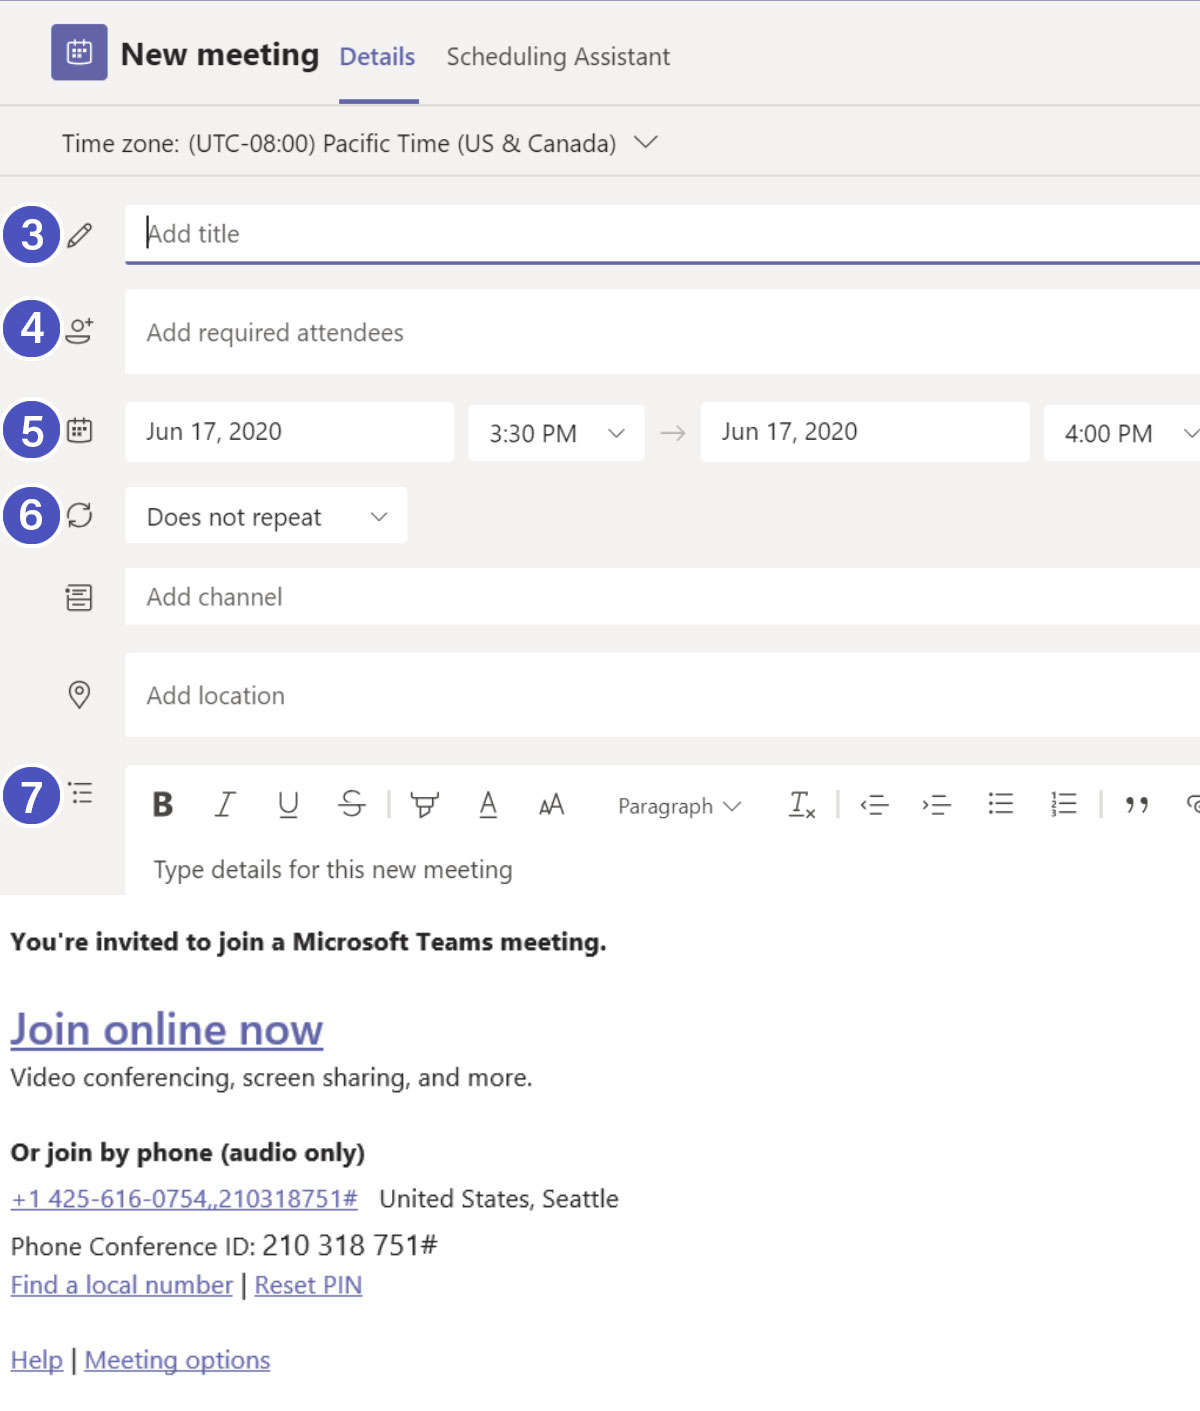
Creating a meeting invite in Teams
- Open the Teams client, select the Calendar icon located in the left side navigational bar.
- Select the New meeting button located in the top right corner of the screen.
- Enter a Title for your meeting invite.
- In the Required Attendees box, enter the email addresses for the people you want to invite to the meeting.
- Select a Start and end time for the meeting.
- If you need the meeting to be recurring, select the Does Not Repeat dropdown menu and recurring selection(s) options will appear.
- For internal attendee(s), select the Scheduling Assistant tab (top left) to see if the attendee(s) are available at the time you are proposing.
- Add content to the body of the invite to inform participants on the purpose of the meeting.
- Double check your information and then click the Save* button.
*When you select the Save icon, the Teams meeting link info is automatically created and sent out in the invite. If you have an auto conferencing license, a phone number and conference ID will be included.

Presenter best practices
Presenting with ease
Optimize your content for digital delivery
- Identify your central message.
- Have a clear call to action within your presentation.
- Prepare content that you are familiar with and uses both text and visual images.
- Do not read your slides to the audience. Use a bullet point format and add value with your expertise.
- New! Use the PowerPoint Presenter Coach to evaluate your presentation delivery.
- Review settings under the Slide Show menu (if using PowerPoint) to customize your defaults.
- Rehearse timing to ensure you can adequately cover your content in the time provided (Slide Show | Rehearse Timings command).
- Consider putting housekeeping and resource slides at the beginning when you have people’s attention, so you do not disrupt Q&A toward the end of your session.
- Ask your organizer how and where to share your final materials with your audience.
Example: Building a 30-minute digital breakout
- Focus your message
- Be concise
- Use demos to show your point but don’t be afraid to short cut
- Deliver the roadmap for ongoing engagement (skilling, online support, other programs)
- Use the rehearsals for feedback
- Prepare lead-in questions to get the Q&A started
Session flow
| Time (min) | Description | Owner |
| 1 | Introduce Presenter and set expectations about the session. | Moderator |
| 10-15 | Session content delivery, including slides, demos, and call to action. | Presenter |
| 15-19 | Open Q&A, questions will be read and answered for Attendees. | Presenter/ Moderator |
Presentation structure
This simple outline shows how the parts of your presentation will be combined before being presented to your audience. Some elements will be added by the post-production team before distribution.
1. Opening slate

10-second opening title that includes event branding, session title, and your name/title/social contact information.
2. Video greeting

Overview of what will be presented. Recorded via Windows Camera, Mac tools, or other 3rd party app. Key learning: Let your audience visually connect with you as you start.
3. Core content

Recorded via PowerPoint screen record feature or other 3rd party app. Can be concurrent with opening.
4. Core content – continued

Continued content from PowerPoint.
5. Short conclusion

Call to action or pointer to resources. Recorded via Windows Camera App or other 3rd party tool. Key learning: Connect with your audience visually at the end of your presentation.
6. End slate

Branded ending slate. Use an end slide that is appropriate for your organization.
Equipment and environment
Your equipment
External microphone: Audio is the most important portion of your presentation. You should plan to have a microphone that is external to your computer. Avoid using laptop speakers/microphones for the best audio.
Web camera: Select a webcam that delivers a minimum 720p (ideally 1080p) resolution. Position camera at or slightly above eye level.
Test it! Ask for a rehearsal time or schedule your own live event/Teams meeting to test the process. Use the test call feature in Teams to record a voicemail that will play back to you so you can hear your own voice.
Lighting: If you will be frequently presenting, consider getting a stand-alone LED light that will provide you with a higher quality image on video. Avoid sitting where there is heavy backlighting.
Your environment
Validate you are in a relatively quiet location with a good quality microphone.
Utilize a comfortable seating or standing arrangement. Ensure your setup does not introduce additional noises (squeaky chairs, ceiling fans).
We all have interruptions but consider putting a sign on your home office door, so family members know when you are presenting or recording.
Location and lighting

Take a moment to prepare your recording space.
- An HD webcam is preferred, but a new PC or tablet will have a good camera as well
- Your camera should be stable at or slightly above eye level
- Make sure your face is in good, even light, with no harsh backlight. In addition, avoid mixing light sources (e.g., window and lamp light) as the different color temperatures will show up in the video
- Do not sit in front of a window. Your webcam will compensate, which will cause your face to look dim or dark.
- Reduce clutter and distracting or bright images in the background
Wardrobe

Consider what you plan on wearing and how that will show up to your audience. Make sure your wardrobe matches the tone of your presentation.
- Do NOT wear white
- Solid colors work best
- Avoid small prints, stripes, plaid, or patterns
- Unless otherwise specified, shirts with logos and trademarks should be avoided
- Avoid noisy jewelry (necklaces, bracelets, earrings, etc.) as it can be distracting to the viewer
Audio quality

Find a quiet location, sit for a minute, and listen to your environment.
Can you hear noises in the hall, an air conditioner, or the buzz of a fan in your computer or laptop? These things can have an impact on the quality of your audio.
Try to pick a space that is smaller and with soft walls such as curtains. It will keep the sound from bouncing around, which will make your audio sound hollow. Finally, make sure to turn off any nearby mobile devices.
For the best quality review your device options at https://aka.ms/TeamsDevices.
Audio equipment

It’s best to have a headset if possible. A USB microphone is preferred.
Wired headsets can be a good alternative to the USB microphone. You will want to find a quality headset microphone that does not obstruct your face too much since your image will be visible in most cases.
Be sure to keep the headset microphone about a half inch off your face. Soft spoken words tend to get garbled for the listener on the other end. Speaking up and keeping your level consistent will also help listeners set their volume correctly.
Presentation modes

How you present to your audience is important. Varying the source of information as you speak keeps your presentation dynamic and accommodates diverse learning needs.
Try to change presentation modes (talking to camera, video, PowerPoint, demo, video, interview, etc.) every 3-5 minutes. For example, if your presentation is heavy on PowerPoint, consider either adding a secondary element (i.e., video), or at least change back to camera every so often so that the audience can see you again and have a momentary change of pace and medium.
Conversational speaking

Remember that your audience is most likely at home watching you on a small screen. Sessions are much more intimate and on-demand now.
Speak with energy and with a tone of voice that you would normally have, as if you’re holding a conversation with colleagues. Your time will go by quickly, as it always does. Keeping your content tight, focused, and trying not to repeat yourself helps the audience stay engaged.
Example presenter kit
Good quality hardware will streamline your presentation experience not only for virtual events but for day-to-day video calls. These devices are examples and similar items from different providers are also acceptable. Encourage Presenters to also consider Teams certified devices for the best audio experience.
USB lapel microphone
USB ethernet dongle, 50′ ethernet cable
Laptop stand for webcam to be at eye level (example: rain Design mStand Laptop Stand)
Keylight with stand and power supply (example: Genaray Ultra-Tin Bicolor 288 SMD LED On-Camera Light Basic Kit)
Checklist: recording from home
Presenting
- Computer is plugged into a power outlet
- Wired network connection is preferred
- Minimize Wi-Fi traffic on your network while recording
- Turn off/silence your cell phone
- Webcam that delivers a minimum 720p (ideally 1080p)
- Invest in a good external microphone or speaker puck
- Camera should be at or slightly above eye level
- Backup of materials should be on your local computer
- Rehearse enough to be comfortable with your material so your personality will shine through.
- Avoid reading your slides to the audience.
Computer
- Clean up desktop
- Hide the taskbar if showing desktop
- If showing demo, 1920×1080 screen resolution
- Use latest browser (Edge or Chrome)
- Clear browser history or switch profiles
- Close unnecessary applications
- Turn off all notifications
- Update your computer prior to your recording date or disable
Environment and wardrobe
- Record from a private room or location (avoid disruptions)
- No harsh lighting on your face or behind you
- Warm light (desk lamp) is preferred
- Backdrop should be natural but uncluttered
- Teams background effects are useful. Consider one for your event.
- Solid or subtle pattern shirt appropriate for your audience
- Avoid busy pattern, all white, or grass-green shirts (for green screen effects)
Recording – PowerPoint
- To start recording within PowerPoint, open a new or blank presentation. On the Insert tab of the ribbon, select Screen Recording.
- On the Control Dock, click on Select Area and either select the entire screen for recording or press Win Key+Shift+F. It is critical that the entire screen is selected. PowerPoint automatically records the audio and mouse pointer. To turn them off, deselect Audio and Record Pointer in the Control Dock.
- To start, click Record or use the following key commands:
Start recording: Win Key+Shift+R
Pause/resume: Win Key+Shift+R
Stop recording: Win Key+Shift+Q - When you’re finished recording, save your video. Right-click the inserted file on the slide that represents the recording and select Save Media as. In the dialog box, specify a filename and location. Sample naming convention:
SESSIONCODE_SpeakerName_PRES.filetype or
EVENTNAME_SpeakerName_MMDD.filetype

Tip: Unless you pin the Control Dock to the screen, it will slide up into the margin while you record. To make the unpinned Control Dock reappear, point the mouse cursor at the top of the screen.
Recording – Windows 10 Camera App
- App settings:
- Search for “Camera” in Windows Search
- Select “Camera App”
- Make sure that the video quality is set to 1080p 30fps in settings
- Getting ready: On the main navigation, click on the “Take Video” button. It may be defaulted to pictures. Set up your shot and center your face within the frame. Make sure you have good lighting, be careful of reflection in your glasses. Click the “Take Video” button again to record. Rename file and upload.
- When complete, review your video in the lower right corner of the App or go the file location located in this folder C:\Users\username\Pictures\Camera Roll. Sample naming convention:
SESSIONCODE_SpeakerName_CAM.filetype or
EVENTNAME_SpeakerName_MMDD.filetype

Continue to phase 2: During the event
Proceed to the next phase for virtual event guidance on managing, producing and executing your live event.
Continue playbook
